
Oh, I remember the first time I tried to set up a Christmas gift wrap display at home—I thought it would be simple. I pictured a neat little corner with rolls of wrapping paper and ribbons lined up perfectly. Spoiler: it looked more like a colorful tornado had passed through! But that chaos taught me something important: styling a gift wrap display isn’t about perfection—it’s about creating a space that feels joyful and inviting.
If you’ve ever felt frustrated with messy wrapping corners or piles of ribbons, I get it. We all want our gifts to look special, but also need the process to be fun, not stressful. In this article, I’ll share some simple, practical tips that make your gift wrap display both functional and beautiful. You’ll learn how to organize your supplies, add little decorative touches, and even make wrapping gifts feel like part of the holiday magic. Trust me, it’s easier than you think!
Christmas Gift Wrap Display Styling
Color-Coordinated Wrapping Station
Source: Pinterest
Organizing wrapping supplies by color completely transformed my corner. I grouped reds, greens, golds, and silvers with matching ribbons in jars. Picking paper became faster and more joyful, and the kids loved choosing their favorite colors. Sorting by color turned a messy pile into a visually appealing display and inspired new creative combinations. It also helps me plan which gifts to wrap together for a cohesive look. The corner feels more intentional, and I can see exactly what’s available without digging through piles. It’s simple, functional, and cheerful.
Holiday Pegboard
I mounted a pegboard to hold scissors, tape, small ornaments, and tags. Kids love grabbing items from the hooks, which makes wrapping more interactive. The pegboard keeps everything visible and off the floor, making the corner look organized without being rigid. Hooks can be rearranged depending on the supplies, which adds flexibility. It’s practical and visually appealing, and I’ve found that this setup encourages kids to help. Adding a few decorative pieces makes it feel festive, and the pegboard doubles as both storage and decoration for the wrapping area.
Repurposed Wine Rack
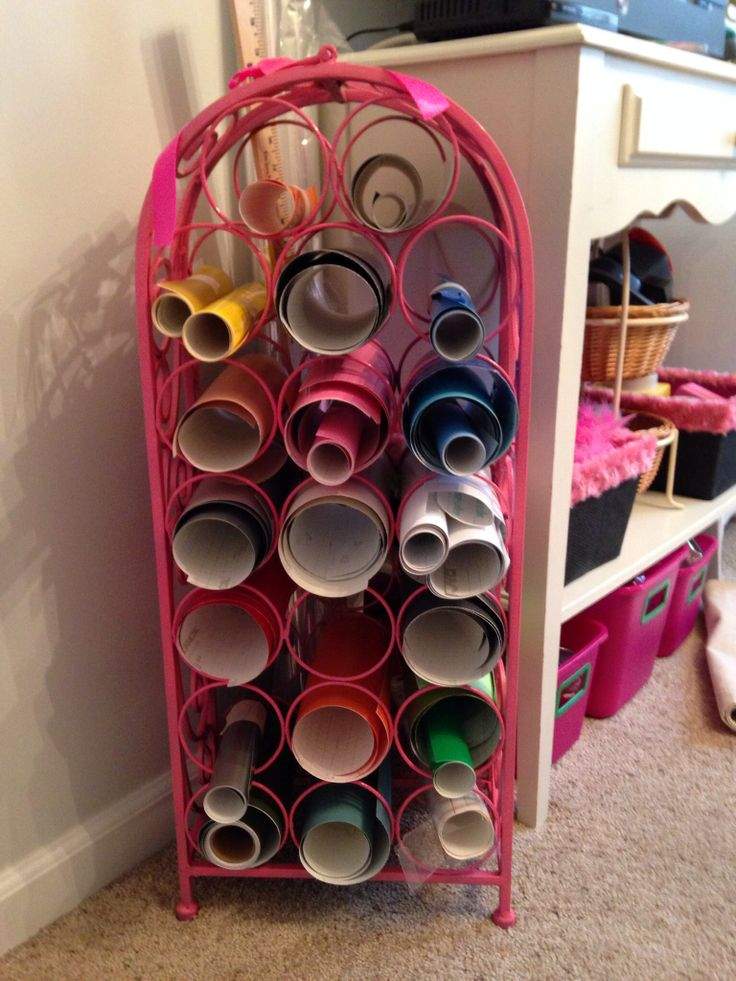
Source: Pinterest
I used an old wine rack to hold paper rolls upright, and it works surprisingly well. Kids can reach the rolls easily, and the slots prevent them from falling. It’s a cost-effective solution that keeps the corner organized. To be fair, larger rolls need a little adjustment, but it’s manageable. Using repurposed items adds charm and creativity to the wrapping station. The display keeps supplies visible and accessible while making the corner look intentional and festive. It’s simple, functional, and adds a touch of personality to the space.
Festive Tray Display
A large tray holds scissors, tape, and small tags in one place. Kids enjoy grabbing what they need, which makes wrapping more collaborative. The tray is portable, so I can move it anywhere the wrapping happens. Small bowls inside keep items from sliding around, which keeps things neat. Displaying supplies on a tray also makes the corner feel cohesive and tidy. It’s a practical and decorative solution that simplifies gift wrapping while giving the space a cheerful, organized vibe.
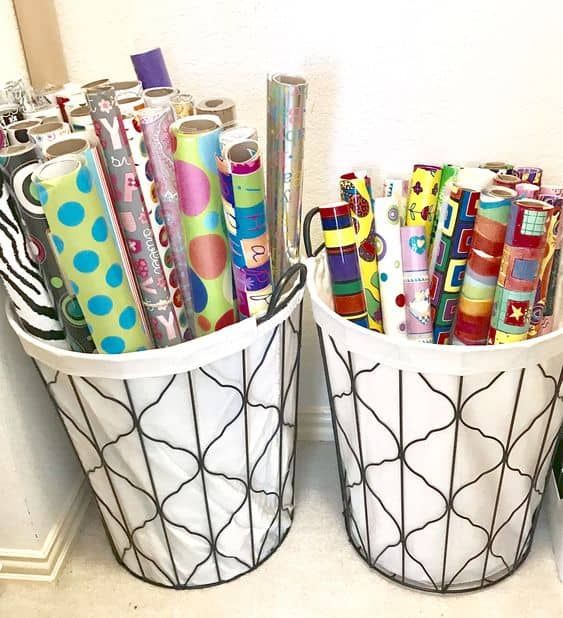
Hanging Wire Baskets
I mounted wire baskets on the wall to hold paper, ribbons, and cards. The kids can reach what they need without making a mess. The airy design keeps the corner from feeling heavy while maximizing vertical space. It keeps supplies visible and organized while adding a modern, light touch. I’ve found that kids love helping themselves, which makes wrapping more interactive. The baskets keep clutter off the floor and make supplies easy to grab, creating an organized and cheerful wrapping station for the holidays.
Tiered Cake Stand
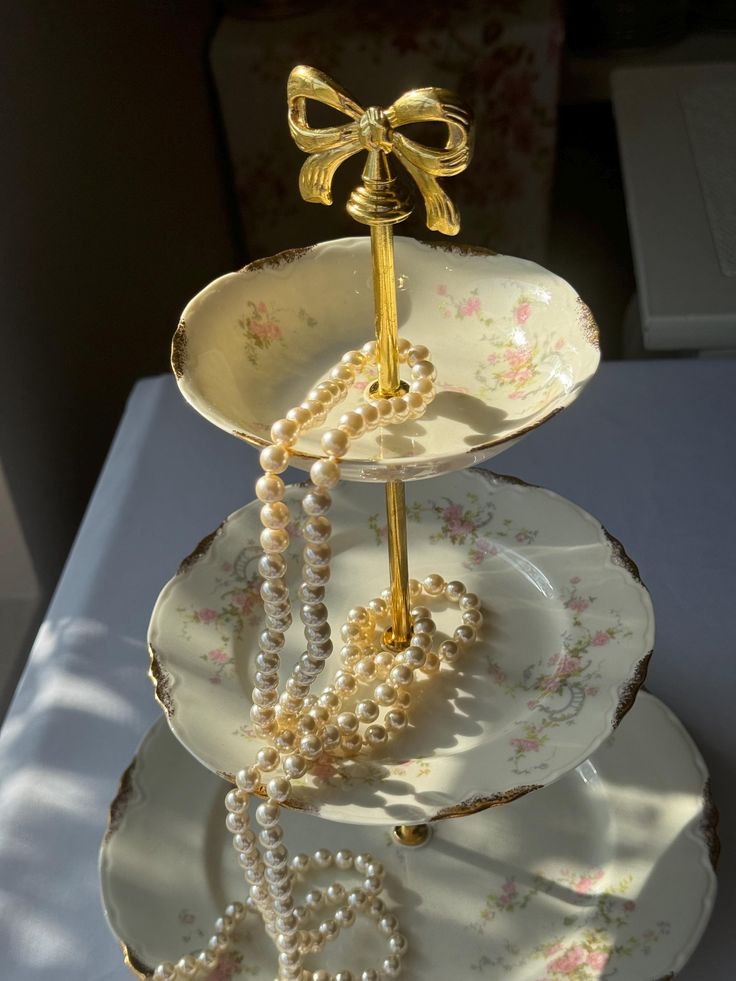
Source: Pinterest
A tiered cake stand holds small bows, clips, and tags in one spot. Each level separates supplies for easy access, and kids enjoy picking items from different tiers. The stand also doubles as decoration, adding a playful touch to the wrapping area. It keeps small supplies organized and accessible while freeing up table space. Using a cake stand adds height and visual interest, turning the corner into a cheerful, festive display. It’s simple, functional, and encourages kids to participate in gift wrapping without creating clutter.
Peg Hook Ribbon Wall
I added peg hooks to a wall to hold ribbon spools. Kids enjoy spinning the ribbons to select their favorites, which makes wrapping interactive. It keeps ribbons organized and off the floor while making them easy to grab. The setup also creates a visually appealing display that adds charm to the corner. Using peg hooks allows me to adjust spacing for different spool sizes, which keeps the area flexible. It’s functional, tidy, and encourages the kids to help with wrapping while keeping supplies in order.
Rolled Paper Basket
Source: Pinterest
I rolled sheets of wrapping paper and placed them in a basket to prevent wrinkles. A divider keeps the rolls upright and tidy. Kids enjoy pulling out rolls themselves, which makes wrapping more interactive. The basket keeps supplies contained and easy to reach while giving the corner a casual, organized look. Using a basket is simple, inexpensive, and practical, and it makes the gift-wrapping area visually neat. It’s a versatile solution that combines functionality with a festive, approachable display.
Ladder Ribbon Display
I draped ribbons across the steps of a small ladder for a decorative and functional display. Kids enjoy selecting ribbons from the steps, which turns wrapping into a playful activity. Heavier rolls can be clipped to prevent slipping. The ladder adds height and charm to the corner while keeping ribbons organized and accessible. It encourages participation from the kids while creating a festive visual element. Using a ladder makes the wrapping station feel cozy and intentional without requiring extra furniture or complicated storage.
Cardboard Paper Holder
I used cardboard tubes to hold paper rolls upright, keeping them organized and accessible. Kids enjoy helping place and retrieve rolls themselves. The display prevents paper from getting squished or rolling across the floor. Using simple cardboard tubes is inexpensive, easy to set up, and adds a handmade charm to the corner. It’s functional while keeping supplies visible and tidy, and it encourages kids to participate in the wrapping process. The setup works well for small spaces and adds a creative, playful element.
Clear Bin Storage
Clear plastic bins hold extra paper, ribbons, and bows, keeping everything visible and easy to find. Kids enjoy helping themselves to supplies without creating clutter. Bins are stackable, which maximizes space and keeps the corner neat. It’s simple, practical, and flexible, allowing me to adjust what’s stored each year. Seeing everything at a glance saves time while wrapping, and the clear design makes the area look organized and cheerful. This solution keeps supplies accessible while maintaining a tidy, functional wrapping station.
Garland Crate Display
I filled wooden crates with wrapping supplies and draped garland over them for a festive touch. Kids love pulling items from the crates, which makes wrapping interactive. The crates keep everything organized while the garland adds decoration. This method combines function with visual appeal, turning a practical display into a charming holiday feature. It keeps the corner tidy, accessible, and inviting. The garland adds warmth and cheer, creating a cozy, organized space for gift preparation while encouraging the kids to help.
Pegboard and Bin Combo
View this post on Instagram
I combined a pegboard with small bins for wrapping supplies. The pegboard holds scissors and tape, while the bins contain paper and tags. Kids enjoy grabbing items from both, making wrapping a collaborative activity. This setup keeps everything visible, organized, and within reach. It also adds visual interest to the corner and allows me to rearrange hooks or bins depending on the supplies. It’s functional, tidy, and encourages participation, making gift wrapping smoother and more fun for everyone.
Rolling Cart Station
I use a rolling cart to hold all wrapping supplies in one place. It’s portable, so I can move it anywhere the wrapping happens. Kids enjoy reaching for items themselves, which makes the activity interactive. Each level separates paper, ribbons, and small items, keeping everything organized. Using a cart saves space and allows me to bring the entire station to a table when needed. It’s practical, flexible, and visually tidy, creating an efficient and cheerful corner for gift wrapping during the holidays.
Rustic Wooden Crates
I stacked a few wooden crates and filled them with paper rolls, ribbons, and tags. Arranging everything neatly made the corner feel cozy and inviting. Adding small ornaments on top brought in a festive touch. The kids can reach the supplies easily, and the natural wood adds warmth and charm. Crates keep items organized without looking too rigid, making wrapping more approachable. Using what I already had saved space and created a decorative corner. It’s practical, flexible, and adds a cozy homemade feel to gift wrapping.
Mason Jar Ribbon Storage
Rolling ribbons and placing them in mason jars made everything visible and easy to reach. The kids enjoy helping pick ribbons, which turns wrapping into a shared activity. It keeps the area tidy and doubles as decoration because the jars show off patterns and colors. Refilling jars each year is simple, making it a practical, long-term solution. The system prevents tangled ribbons and keeps small spaces organized. It’s a cheerful display that makes gift wrapping smoother and more enjoyable, encouraging creativity while keeping everything in one place.
Wall-Mounted Paper Rack
I installed a rod on the wall to hang paper rolls, which freed up a lot of space. A small basket underneath holds scissors and tape, keeping everything in one place. Vertical storage makes grabbing rolls effortless, and the kids love reaching for their own choices. It keeps the corner tidy while giving it a mini “shop-like” feel. The setup is practical, visually organized, and encourages kids to participate. It also makes wrapping faster and more enjoyable because every supply is easily accessible and displayed neatly.
Mini Christmas Tree Ribbon Display
Looping ribbons over a small tabletop Christmas tree instantly made the corner festive. The kids love picking ribbons from the branches, and it makes the space interactive. Heavier rolls sometimes droop, but rearranging them works well. The tree combines decoration with functionality, making it a playful centerpiece. It encourages creativity and makes gift wrapping feel magical. Displaying supplies like this makes choosing ribbons fun and hands-on, and it adds personality to the wrapping area while keeping everything organized and easily accessible.
Tiered Basket Organizer
View this post on Instagram
I set up a three-tiered basket to separate paper, ribbons, and tags. Each layer keeps supplies organized and within reach. Kids enjoy pulling out items, which makes wrapping more interactive. The basket is portable, so I can move it anywhere the wrapping happens. It keeps the space tidy while giving it a layered, decorative look. Using tiers maximizes vertical space, making the corner feel organized without being too structured. It’s simple, functional, and helps everyone find what they need without creating clutter.
Chalkboard Inspiration Wall
Painting a chalkboard wall for ideas or bow sketches turned the corner into a creative space. The kids love adding their doodles and suggestions. It also helps me remember which gifts are wrapped and what supplies are needed. The chalkboard doubles as decoration and keeps the area lively. It encourages experimenting with different wrapping styles while keeping everything organized. Having a place to jot down notes or sketch bows makes the activity interactive and visually interesting, adding a personal and playful touch to the gift-wrapping area.
Hanging Clip Display
I strung twine across a wall and used mini clips for paper sheets and tags. The kids enjoy arranging items or choosing what to use, which makes wrapping interactive. Completed tags can hang here as decoration, turning the wall into a mini gallery. The display keeps supplies off the floor while remaining easily accessible. It adds a casual, artsy touch to the wrapping corner. The simplicity of the clips and string keeps the space organized and fun, while providing a playful way to showcase wrapping materials.
Wooden Ladder Display
Leaning a wooden ladder against the wall and draping paper rolls over the steps gives a rustic, creative vibe. Kids can easily reach the rolls, making wrapping more interactive. Securing the ladder ensures stability, and it doubles as decoration. The corner feels cozy and intentional, giving gift preparation a relaxed yet festive atmosphere. The ladder display makes everything visible and adds charm, turning an ordinary storage solution into a decorative feature. It encourages participation from kids while keeping supplies organized and accessible.
Ribbon Spool Wall Mount
Mounting dowels on the wall to hold ribbon spools keeps everything visible and organized. Kids enjoy spinning the spools to pick ribbons. The wall display makes grabbing supplies fast and easy, saving time during wrapping. It also prevents clutter while adding a mini boutique vibe to the corner. Having everything in one place encourages kids to help and makes the activity more interactive. This setup keeps the corner tidy, functional, and visually appealing, while allowing for creative ribbon combinations and easy access to every color.
Gift Wrap Basket Tower
Stacking baskets vertically for paper, ribbons, and tags creates a compact, organized display. Kids love pulling items from each level, making wrapping more interactive. Each basket separates supplies and maximizes vertical space. The stack is portable, so it can move wherever wrapping happens. It keeps everything contained, organized, and accessible. The display looks decorative without being rigid, making the corner feel playful and functional. Using baskets this way ensures supplies are easy to grab while keeping the wrapping area tidy and visually appealing.
PVC Paper Holder
Cutting a PVC pipe to hold large rolls of wrapping paper keeps them upright and organized. It takes minimal space, and kids enjoy picking rolls themselves. The setup prevents paper from rolling around and makes grabbing the right color quick. It’s a simple, inexpensive solution that keeps the corner neat and functional. Using PVC allows me to customize the height for different roll sizes. The display is practical and visually clean, which makes wrapping faster and keeps supplies accessible without cluttering the area.
Glass Jar Bow Collection
Placing pre-made bows in glass jars creates a cheerful and organized display. Kids enjoy picking their favorite colors for each gift. Layering tissue paper keeps the bows in good shape. The jars are easy to refill and make choosing bows quick. They also double as decoration, adding a pop of color to the corner. This method keeps small supplies visible and tidy, while encouraging the kids to help with wrapping. It’s practical, decorative, and makes gift preparation easier and more fun.
Upcycled Crate Wall Display
Mounting old crates on the wall provides storage for paper rolls, ribbons, and tags. Kids can reach supplies easily, and the rustic crates add a cozy, festive feel. Vertical storage frees up floor space and keeps everything visible. Using what I already had adds charm while keeping things practical. The display combines function and decoration, turning cluttered supplies into an organized feature. It encourages participation from kids while making the wrapping area visually appealing and accessible.
Ribbon Spool Hanger
I used a metal hanger to hold ribbon spools that spin freely. Kids enjoy selecting and spinning ribbons, which makes wrapping more interactive. It keeps supplies off the floor and easy to grab. The display is simple, functional, and adds a touch of fun to the corner. Using a hanger keeps the area tidy while allowing quick access to colors and patterns. The kids love helping, which turns wrapping into a shared activity.
FAQ
How do I keep my gift wrap display from looking cluttered?
Use containers, baskets, or clear jars to group items together. Rolls of paper can be stored in a tall bin, ribbons in a box, and smaller accents in trays. When everything has its own spot, it looks neat and intentional.
What’s the best way to organize different wrapping papers?
Try sorting by color or theme. You can stand them upright in a basket or use a rolling cart with sections. It’s both functional and visually pleasing, especially if you want your display to double as decor.
How can I make my gift wrap display look festive?
Add a few holiday touches like fairy lights, a small garland, or even mini ornaments hung nearby. These little accents instantly transform a basic storage spot into a cheerful holiday corner.
Where’s the best place to set up a wrapping station?
Choose a space where you have enough room to spread out, like near a dining table or desk. A rolling cart is a great option if you don’t have a permanent spot—you can move it wherever the wrapping happens.
How do I involve kids in the gift wrapping display?
Let them choose their favorite ribbon or tag and make part of the station accessible to them. Having a spot for stickers, crayons, or kid-friendly scissors makes them feel included without messing up your main supplies.

I’m father joaquin perez, we are a catholic church with all the sacraments where everybody is welcome. we celebrate catholic mass every Sunday at 12:30pm at saint stephen episcopal church at 2750 McFarlane road, Miami, Florida