
I always tell people that stunning party backdrops don’t need expensive rentals or designer materials, because some of my favorite setups come from simple, budget-friendly DIY ideas. When I plan on a smaller spend, I focus on creativity first, using things like paper streamers, balloons, fabric scraps, fairy lights, and cardboard cutouts to build something eye-catching. Mixing textures and colors usually does most of the heavy lifting, and honestly, guests rarely believe how little everything cost once it’s finished.
Table of Contents
ToggleI also love how DIY backdrops let me personalize every detail, from handwritten signs to photo frames and themed props that match the celebration perfectly. There’s something so satisfying about stepping back and seeing a handmade display transform a plain wall into the party’s main attraction, especially when it becomes everyone’s favorite photo spot.
Party Backdrop Ideas On Budget
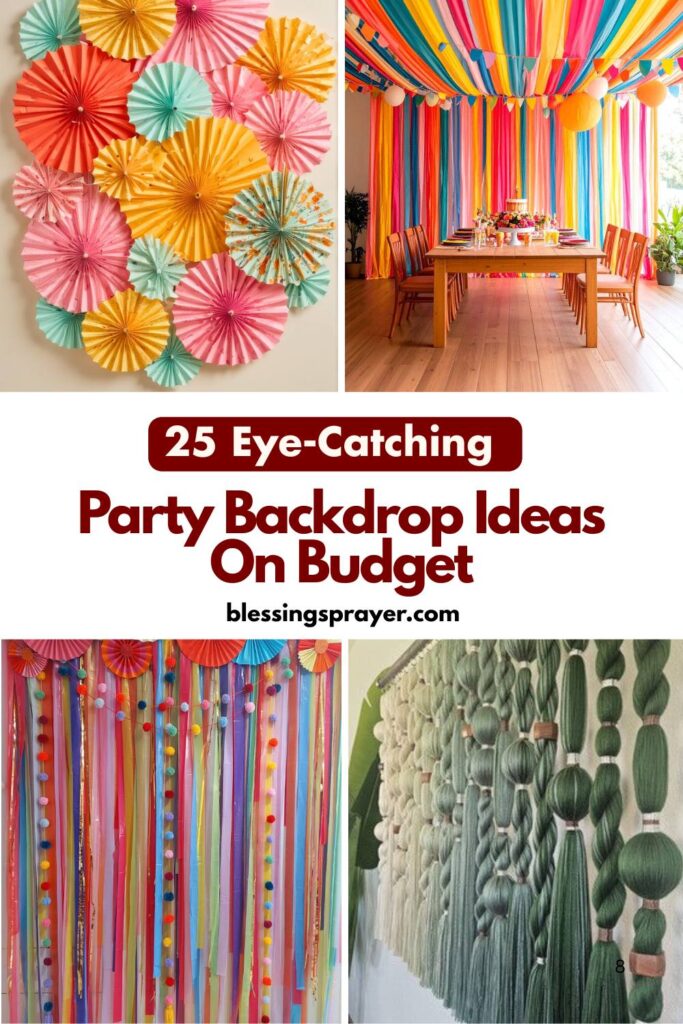
Streamer Wall Explosion
Source: Pinterest
I love using paper streamers because they’re cheap, colorful, and incredibly easy to work with. I tape long strands vertically or diagonally across a blank wall, then layer two or three shades for depth. Mixing matte and metallic finishes adds extra shine without raising costs. Sometimes I twist a few pieces together for texture or cut fringe along the ends for playful movement. A simple handmade sign in the center instantly personalizes everything. This backdrop comes together in under an hour and photographs beautifully, especially once guests start posing in front of all that flowing color.
Paper Plate Pattern Wall
I love how ordinary paper plates turn into eye-catching decor when arranged creatively. I tape them to the wall in circles, waves, or sunburst shapes, then paint or color them to match the party palette. Mixing plain plates with patterned ones adds texture without spending extra. Writing small messages or doodles on a few plates makes the display feel personal. Sometimes I place a banner across the center for a clear focal point. This backdrop is lightweight, quick to assemble, and surprisingly stylish for such a simple supply.
Pool Noodle Arch Frame
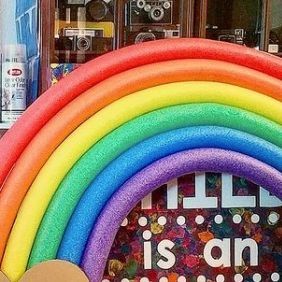
Source: Pinterest
Pool noodles are cheap and perfect for building soft, curved frames around photo areas. I bend them into arches or circles, tape them together, and wrap them with streamers, ribbon, or faux greenery. Anchoring them to buckets filled with sand keeps everything stable. I usually hang a handmade sign or balloons from the top so the structure feels complete. This idea creates dimension on a tight budget and works great both indoors and outdoors for birthday photos.
Coffee Filter Flower Wall
Coffee filters make beautiful, delicate flowers when stacked, dyed, and scrunched together. I tape clusters of them onto cardboard panels or directly on the wall for a full floral look. Using two shades of dye keeps things affordable yet interesting. Adding green paper leaves fills empty spots quickly. I love placing a name cutout in the middle for personalization. This backdrop looks soft and expensive, even though it costs very little and only takes basic craft supplies.
Pegboard Prop Display
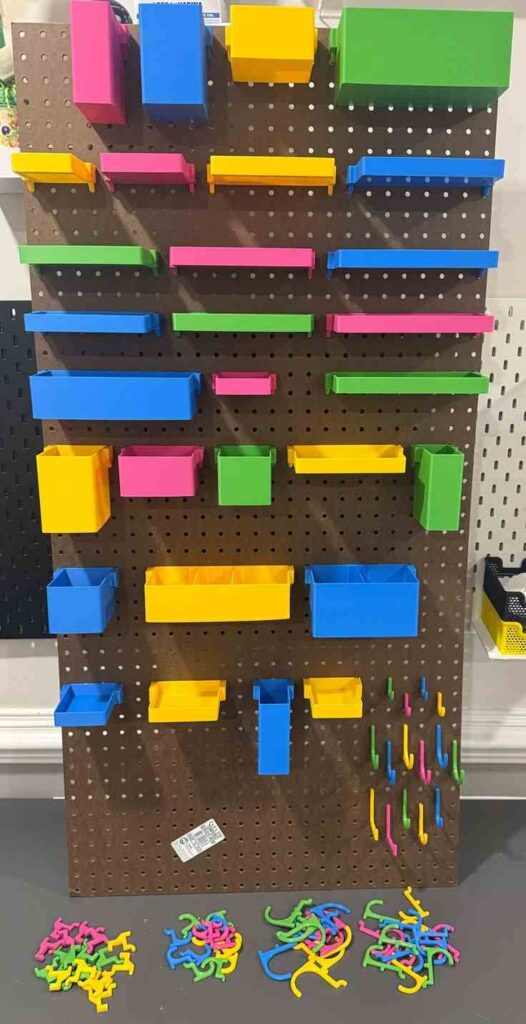
Source: Pinterest
Pegboards can double as structure and decoration when styled thoughtfully. I hang one or two boards and clip photos, balloons, paper shapes, or signs onto the hooks. Painting the board a fun color instantly transforms it into party decor. I rearrange items easily during the event, which keeps the area fresh and interactive. Guests love snapping pictures here because it feels layered and creative without being cluttered or costly.
Paper Lantern Cluster Wall
Paper lanterns are affordable and instantly festive when grouped together. I hang different sizes in a tight cluster against the wall or from a frame so they float at varying heights. Sticking to one color family keeps everything cohesive. Adding fairy lights inside a few lanterns brings soft glow for evening parties. I finish with a simple banner across the front. This backdrop feels airy, cheerful, and perfect for filling big spaces without overspending.
Ribbon Cascade Wall
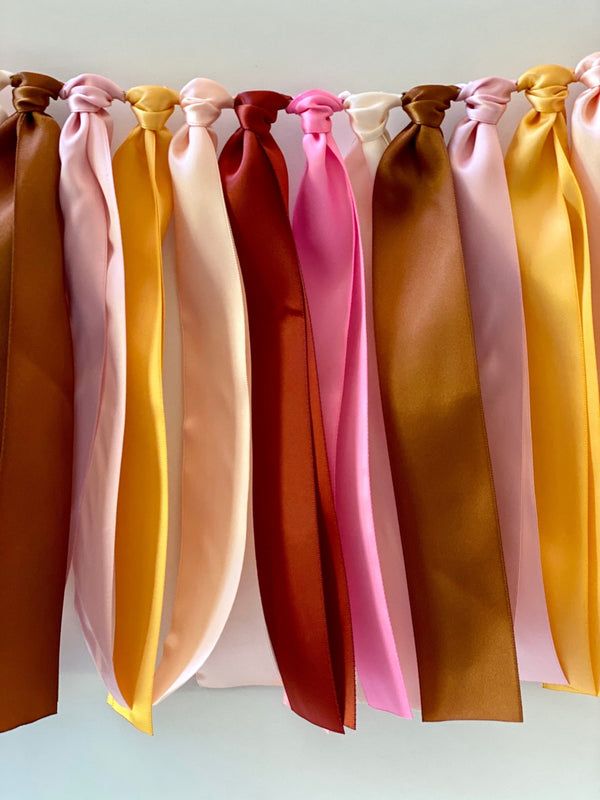
Source: Pinterest
I love ribbon backdrops because they’re inexpensive, lightweight, and instantly cheerful. I tie long ribbons in two or three matching colors onto a piece of string or dowel rod, then tape or hang it against the wall. Mixing satin, grosgrain, and sheer ribbon adds texture without extra cost. Sometimes I curl a few strands for playful movement. A handmade name sign or paper cutout in the center personalizes everything beautifully. This setup sways slightly when people walk past, which looks great in photos and gives the whole party area a lively, handmade charm.
Wrapping Paper Panel Display
Instead of buying fancy decor, I grab leftover wrapping paper rolls and tape large sheets onto cardboard or directly on the wall in neat panels. Mixing two or three coordinating patterns creates visual interest while staying budget-friendly. I frame the edges with washi tape for a polished look. Adding balloons or paper flowers at the corners pulls everything together. This backdrop feels surprisingly upscale for how simple it is, and it’s perfect when you want bold color or theme prints without spending money on specialty materials.
Handwritten Poster Collage
Poster boards are cheap and endlessly customizable, which makes them perfect for DIY backdrops. I cover several boards with quotes, doodles, stars, or party-themed drawings using markers and paint pens. Writing the guest of honor’s name across multiple boards adds a fun focal point. Hanging them in a grid creates a wall-sized display that feels intentional. I sometimes sprinkle in glitter glue or stickers for shine. This idea feels personal, creative, and totally unique, which guests always notice and appreciate right away.
Newspaper or Magazine Wall
This one feels artsy and costs almost nothing if you use old papers or magazines. I tape pages across the wall in overlapping rows, then highlight certain words or images with bright markers. Adding a bold cutout message over the top keeps it party-ready instead of random. Fairy lights around the edges soften the look and make photos glow. I love how customizable this is for birthdays or graduations because you can circle jokes, memories, or inside references everyone recognizes.
DIY Tassel Garland Backdrop
Tassel garlands are simple to make from tissue paper and instantly add celebration vibes. I hang several rows vertically or horizontally across a wall, layering colors for fullness. Mixing matte and metallic tissue gives extra sparkle without big spending. I usually place a sign or balloon cluster in the center so the backdrop feels complete. This setup comes together quickly, packs flat for storage, and works for almost any theme. Guests always comment on how festive it looks, even though it barely costs anything.
Painted Sheet Art Wall
Old bedsheets become amazing backdrops with a little creativity. I spread one out and paint patterns, polka dots, or stripes using leftover wall paint or fabric paint. Writing a big party message across the middle makes it feel custom-made. Once dry, I hang it with clips or tape. I love how bold this looks in photos, especially because it covers large spaces easily. It’s one of my favorite options when decorating for bigger groups on a tight budget.
Cup Grid Pattern Display
Plastic cups can turn into surprisingly cool decor when arranged creatively. I tape cups to a board or wall in neat rows, then fill some with tissue paper or string lights for color and glow. Choosing one palette keeps everything cohesive. I sometimes spell words or numbers by changing cup colors for personalization. This backdrop feels modern, playful, and totally unexpected, which makes it a hit with teens and adults alike during photo time.
Doily Lace Effect Wall
Paper doilies are super cheap in bulk and create a soft, elegant look when layered across a wall. I overlap different sizes to form a lace-like pattern, then add pastel balloons or florals for contrast. A simple name banner across the top finishes it beautifully. This works especially well for showers or vintage-style parties. I love how something so basic suddenly looks delicate and d xetailed, proving that budget decor can still feel thoughtful and charming.
Book Page Vintage Wall
For cozy or literary parties, I tape photocopied book pages or old pages from damaged books in tidy rows across the wall. Highlighting lines with marker or adding small illustrations makes it feel artistic rather than plain. Fairy lights woven through the display soften everything. I usually hang a banner over the top for a clear party message. This backdrop feels warm, nostalgic, and perfect for guests who appreciate creative, story-inspired details without expensive materials.
Plastic Tablecloth Layer Backdrop
Dollar-store tablecloths are one of my secret weapons for DIY decor. I layer two or three sheer or brightly colored ones against the wall, letting edges overlap for texture. Cutting fringe along the bottom adds movement. Balloon clusters in the corners make it feel more intentional. I sometimes tape photos or paper stars on top for personality. This backdrop is fast, affordable, and covers huge areas easily, which makes it perfect for last-minute parties that still need a big visual statement.
Balloon Strip Garland Backdrop
Instead of hiring professionals, I grab balloon strip tape and build my own garland for a fraction of the price. I mix sizes and stick to one color palette so it looks intentional rather than random. Adding a few faux leaves, paper flowers, or ribbons softens the look and makes it feel fuller. I usually attach the garland across the top of a wall and let it drape down the sides like a frame. This setup always feels high-impact, even though it’s surprisingly affordable and simple to recreate at home.
Fabric Curtain Photo Wall
Fabric backdrops feel elegant, yet they can be super budget-friendly if you use thrifted sheets or discounted tablecloths. I hang them from a curtain rod, string, or taped line across the wall, letting folds fall naturally for softness. Layering two colors creates depth without much effort. Fairy lights tucked behind the fabric add glow and instantly upgrade the look. I sometimes clip paper flowers or photos onto the cloth for personality. This backdrop works for birthdays, showers, and anniversaries, and it always makes photos feel polished and intentional.
Paper Fan Display
Paper fans are one of my go-to tricks when decorating on a budget. I buy them in packs or make my own from craft paper, then arrange them in clusters across the wall. Varying sizes keeps everything interesting and prevents flat-looking designs. I stick to two or three colors so the backdrop doesn’t feel chaotic. Adding a simple banner or name cutout in the center ties it all together. This idea is lightweight, reusable, and easy to adjust, which makes it perfect for quick setups with big visual payoff.
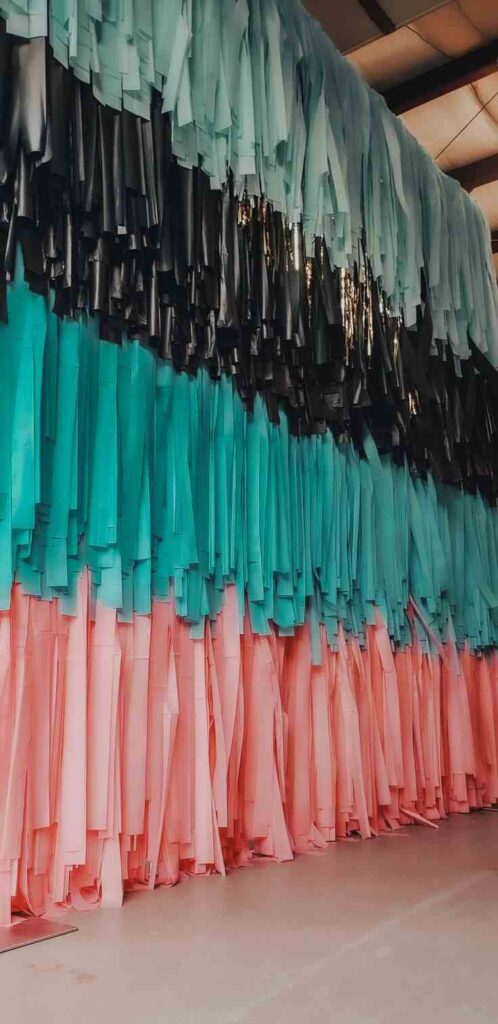
Fringe Curtain Shine Wall
Metallic or tissue fringe curtains instantly scream party, and they cost way less than people expect. I layer two curtains in different shades for dimension and fuller coverage. Sometimes I cut the strips shorter at the bottom for a custom look. Balloon clusters in the corners make the whole thing feel intentional rather than store-bought. I usually tape a handmade sign or neon-style poster over the middle for personalization. This backdrop works especially well for night parties because it catches light beautifully and turns every photo into something festive.
Chalkboard Message Backdrop
For this one, I hang a large chalkboard sheet or paint cardboard panels with chalkboard paint. Then I fill the surface with handwritten messages, doodles, stars, or party-themed sketches. I love adding the guest of honor’s name in big letters so it feels personal right away. Small paper garlands around the edges frame everything nicely. This backdrop becomes interactive too, since guests can write notes or draw pictures during the party. It’s inexpensive, creative, and ends up doubling as entertainment and decor.
Cardboard Cutout Scene
Cardboard is seriously underrated for party decor. I cut large shapes like arches, rainbows, city skylines, or themed props, then paint them using leftover wall paint or craft supplies. Propping them against a wall creates an instant photo zone. I like layering two or three shapes so the backdrop feels dimensional instead of flat. Adding string lights around the edges helps everything pop. This approach is perfect when you want something custom without spending much, and it always impresses guests once they realize it’s homemade.
Hanging Photo Memory Wall
I string twine or ribbon across a wall and clip photos using mini clothespins for a sentimental, low-cost backdrop. Mixing childhood pictures, funny moments, or themed graphics makes the display feel thoughtful and warm. I weave fairy lights through the strings for sparkle and evening glow. Sometimes I add paper stars or flowers between photos for filler. This backdrop always draws crowds because people stop to look through memories, and it turns into both decoration and conversation starter throughout the party.
Paper Flower Garden
Giant paper flowers look dramatic, yet they’re surprisingly cheap when made from crepe paper or cardstock. I tape them directly onto the wall in clusters, mixing sizes and shapes for a garden effect. Choosing two or three colors keeps costs low and design cohesive. Adding green paper leaves helps everything feel fuller. I usually place a name sign or number in the middle so the backdrop feels custom-made. This idea works beautifully for birthdays and showers and gives that “wow” moment without hurting the budget.
Recycled Box Panel Wall
This one feels creative and eco-friendly at the same time. I flatten shipping boxes, tape them together into a grid, and paint or wrap them in leftover gift paper or fabric scraps. Stenciling patterns or writing words across the panels makes everything look intentional. Balloon clusters or paper fans in the corners finish it off nicely. I love how flexible this design is, because you can match any theme using what you already have at home. It’s proof that great backdrops don’t need big spending.
FAQ
How much should I budget for a DIY party backdrop?
Most DIY backdrops can be created for very little money, especially when using dollar-store supplies or items already at home. I usually keep costs low by reusing materials, choosing paper-based decor, and focusing on one main statement wall instead of decorating every surface.
How long does it take to make a budget-friendly backdrop?
Many of these ideas come together in under an hour, especially streamers, balloons, or tablecloth layers. More detailed designs like cardboard cutouts or painted sheets might take a few hours but can be prepped days ahead.
What tools should I keep handy?
Painter’s tape, clear tape, command hooks, scissors, string, and a stapler handle most projects easily. Hot glue guns help too, but I always test on surfaces first.
Can these backdrops work for outdoor parties?
Yes, but I weigh everything down and avoid super-light paper if there’s wind. Pool noodles, boxes, and weighted stands work great outside.
How do I make a DIY backdrop look polished?
Sticking to two or three colors helps a lot. Adding lighting, symmetry, and one central focal point instantly upgrades homemade designs.
Are DIY backdrops reusable?
Many are, especially balloon frames, fabric curtains, pegboards, and ribbon walls. I store them carefully so they’re ready for future celebrations.
What’s the easiest option for last-minute parties?
Streamers, plastic tablecloth layers, and fringe curtains are my go-to choices when time is tight and I still want big impact.

I’m father joaquin perez, we are a catholic church with all the sacraments where everybody is welcome. we celebrate catholic mass every Sunday at 12:30pm at saint stephen episcopal church at 2750 McFarlane road, Miami, Florida